Hiển thị các bài đăng có nhãn Realtime. Hiển thị tất cả bài đăng

Thứ Tư, 7 tháng 3, 2012

Add iOS and Android license to Unity3D for free

In a surprising but understandable move, you can temporarily register for a free (basic) license for Unity3D and add the iOS and Android Basic licenses without cost.

While the Pro version of Unity3D and the additional licenses of the mobile addons are still about $1500 each, the creation of smartphone and tablet apps has finally been more accessible than ever.

For Android apps you need only the additional Java and Android SDK, but it runs on Windows and OSX. Linux is supported for these SDKs but not Unity3D (yet?).

For iOS apps (iPad, iPhone and iPod Touch), you need a Mac with OSX and an Intel CPU. While you can prototype a full app and remote control it using your iDevice, you need a non-free iOS developer license, which is $99/year for individual developers.

What's the catch? This offer is only till 8th of April and the basic versions lack some of the features of the pro versions, but they are very complete and can be used commercially!

Choose your license (and currency format)...


Check it out at the Unity3D Store.

So, what do you plan to develop? I'm looking at getting interactive architectural models from ArchiCAD, passing by Cinema4D and into Unity3D to end up on the iPhone or on a web page.
$0.00 on the Unity Store receipt page

Thứ Sáu, 10 tháng 2, 2012

Review: Google SketchUp for Game Design

Disclaimer: I was asked by Packt publishing if I was interested in reviewing this book. I immediately accepted, as such a book would fit within some of the themes we handle in our classroom and many students and architects are interested in discovering the world of realtime interactive architecture. The coupling of SketchUp and Unity3D is quite accessible and can be completely free, if you use the basic licenses. Packt provided a free review copy of the book and if you buy it through the provided link, there is a small commission. But the review is my personal opinion only.

Book info on the Packt-Publishing website

Google SketchUp for Game Design is a quite recent book, focusing on delivering a reasonable low-entry into the world of Game Design. When you think about presenting architecture to others, an interactive game-like environment is very compelling. Tied to the ubiquity of SketchUp for quick modeling and the Unity3D Game Engine, you can publish interactive models as standalone applications for Windows and OSX, but also on webpages. With an additional license, you can also publish your model to an iOS device (iPhone, iPad, iPod Touch) or an Android device.

The book is, like most books I read from Packt, reasonably priced and paper and print quality is good. While some of the earlier books I have, tended to have quiet dark screenshots, this seems to be avoided with this one, which is a sign that they are improving their publishing quality. While I'm not too fond of the quite heavy black title backgrounds and the very beginner-oriented style, this is a nice book to read through. It is well structured, with clear goals and promises of what will be delivered in each chapter. But be warned that this is primarily a Beginner's Guide (which is marked on the cover), so I sometimes felt that it focused quite a bit on a step-by-step approach. For me, personally, this is a bit distracting, especially as I seldom read books behind the screen of my computer. Just too much chance of distraction…

Review

The first few chapters present a general outlook on developing (modeling and texturing) "props" or "assets" for a Game. Translated for architects, this usually means modeling objects, buildings and the site that become the environment with all its detail. This is not a book about creating walking animated characters or to develop the scripts for a First Person Shooter or a Massive Multi-player Online Environment. There are other books that explore these topics.
First warning: this book tends to be a bit naive, but I assume it is deliberate, as to appeal to a beginner audience, that wants to get started but doesn't know how to.

It does sound a bit too harsh on other books, that are said to be skipping too much steps or tend to promise unrealistic expectations. There is also the claim that game and movies are getting closer together, but I feel that the current game quality is more up the the level of movies of a decade ago. Nice, spectacular, realistic for sure, but the armies of professional Special Effects houses is not standing still either. That said, you can reach a very acceptable graphic quality with reasonable efforts today, even when working alone.
Second warning: I think the writer has chosen the right content for the book, but maybe not the right title…

Only at page 55, you will open SketchUp for the first time, to model a wooden pallet. The first three chapters are looking at "other tools" and "other resources" mostly: stock model and texture websites, some utility software and a full chapter on preparing a texture for the wooden pallet we will develop.

Contrary to the habits of architectural modelers to create complex models with simple colors, game modeling is quite the reverse: creating simple geometry, but heavily relying on textures. This is an important distinction to make when you come from an architectural background. We tend to focus mostly on the building with all its glorious detail, while visualization and game artists focus on the noisy, gritty details through the textures and map this onto the geometry. That said, this is good skill to master, even as an architect, so I advice you to apply it more often in your work. The Photo Match and texturing tools of SketchUp are very adequate and can lead you to very compelling results.
Third warning: this book tends to present what you need to do step-by-step firstly, and only talks about why you would do so afterwards, whereas I would do it the opposite way.

But at least, after you made something, there is usually a paragraph that reflects on it, which has good educational values, even when you eventually use other tools and software.
Fourth warning: while Adobe Photoshop is widely used by artists worldwide, this book explains all texturing work using the GIMP, the Open Source photo manipulation software.

The end result is quite the same, but architects typically are not used to this software. But my advice is to just follow along in whatever software you prefer. There are quite some interesting workflow tips and techniques explained in this book. One particular example makes a simple colored model that is translated into GIMP, where it serves as flat colors to easy the selection process and the creation of masks. Back in SketchUp, the Sandbox tools are discussed, which I never used before. And then the process of getting your SketchUp model inside the free version of Unity3D is described. They specifically mention how to get models from the free version of SketchUp into Unity, which is more involved by the lack of an FBX-export in the Pro-version. While Unity can read Collada files (*.dae), it gives problems with the free version of SketchUp. Here, it is advised to use the FBX Conversion software from Autodesk, who controls the FBX format. Then it is shown how easy it is to load the model, position it, add colliders, so you don't fall through and than how to add a First Person Controller, which is included with Unity3D, that you can use to walk around freely. If you do this for the very first time, this is very rewarding moment and might be all you need to do when you are mainly interested in game modeling to present your design to others.
Fifth warning: Architects like to make clean (and even sterile) models, whereas game artists tend to mimic the more realistic, everyday world around is, with all its grime and grit and all the rubbish that is lying around. So they tend to go for a worn-out look. Be warned.
Almost at the end, and this is very interesting for other use cases too, there is a chapter on how to model a full car, starting from a few blueprints and some pictures. The model is not perfect, but very usable and not too heavy. I do recall how my students often add trees and cars as stock models into their scenes, only to discover that they slow everything down considerably and to discover that they contain more polygons that the actual architectural model they tend to enliven.

After the car, one chapter will elaborate one building into more detail, but this is simply too simplistic for architects, who would use a completely different approach. But a valuable lesson to learn is that you need to think in volumes rather than in planes.
Last warning: avoid single planes! In SketchUp, you see front and back faces, but only the front faces become visible in other software (typically rendering applications or, in this case, Unity3D). Avoiding this demands more attention during modeling, but will lead to cleaner and better behaving models, so it is best to stick to this advice. Only for single glass planes and fences, it might be good to export 2-sided faces.
Appendix A talks about MakeHuman to generate a life-like mesh of a human body and also explains how it can be optimized in Meshlab to limit the amount of polygons, but as it is not used in the rest of the book, I don't see its point here. The character will not be animated (as this would take a whole new book).

Conclusion

Overall, this is an interesting book, primarily for a beginner audience, but only half of it is actually working inside SketchUp. But the results you obtain are relevant and are reachable for everybody, which is not always the case in more advanced modeling or visualization books.

Book info on the Packt-Publishing website 

Thứ Năm, 2 tháng 2, 2012

Autodesk ForceEffect for iOS : Interactive force diagrams

Yesterday, I installed a new (and currently free) app from Autodesk onto my iPhone, called Autodesk ForceEffect (check it out in the App Store).

With this app, you can draw a 2D schematic of beams, nodes and forces. It will allow you to quickly assess the reacting forces into a structure. The examples included with the app also show you that a photograph can be used as an underlay, to sketch on top of them, e.g. to check a structure in the field.
Gallery showing diagram over photo background
While the iPhone screen is quite small for my not-too-small fingers, it works quite handy: there are automatic guidelines that constrain the direction and alignment of nodes you draw. You can switch units between metric and imperial and use gestures for scaling (pinch), panning (two finger swipe) and editing (single touch). Moreover, while it is hard to sketch an exact size for a truss, you can fix the length be entering the exact value on the dimension line and this will be enforces, even when you start moving nodes around.
Draw nodes and forces with your fingers
Click on a truss, and you get the acting forces (in color, with direction to show pressure or tension).

You can generate a report, which could be used to help you enter the exact nodes and sizes and forces in a FEA software afterwards, when you want to go a step further.
Automatic Report
This is exactly the type of app I would have loved while being an architectural engineering student, quite some years ago. It's intuitive, interactive and free (for the moment?). You'll need an iPhone, iPad or iPod Touch to be able to use the software, but I wouldn't be surprised if they will port it to other devices in the near future as well.

Thứ Sáu, 19 tháng 8, 2011

CryENGINE 3 : free SDK for non-commercial work

The CryENGINE is a professional Game Development system, in which you can fully author interactive content, games, simulations. The Software Developers Kit (SDK) was already free for schools, but now individual students can also freely use the 3D engine.

It is a powerful platform, but it requires fairly up to date hardware and Windows.

I have not had the chance to use it, nor play any of the CryENGINE powered games, but it is one of the more famous ones (apart from the Unreal Engine and the Unity3D engine which both are also freely available under certain limitations).

Info on http://www.crydev.net/dm_eds/download_detail.php?id=4

Thứ Ba, 2 tháng 8, 2011

New release : Cinema4D r13

While I haven't had the chance to try it out, now is a good time to check out the improvements announced for Cinema4D release 13, which is said to be available in September.

Right... So when we start the new semester, suddenly we will have to upgrade our software: Cinema4D r13, ArchiCAD 15, maybe Rhino3D 5? This is quite inconvenient as we need some time to learn the new features, see if it makes sense to incorporate them into our learning material and maybe update a few of the screenshots or text in our learning material. I just finished the text for release 12... (see http://caad.asro.kuleuven.be/Manuals/VIZ/Cinema4D/ ).

Anyway, there are some interesting new features. The full detail can be read on different places, e.g. http://www.c4dcafe.com/ipb/topic/61697-maxon-announces-r13/ which has screenshots and movies linked. The downloadable tutorials are free for a short while without registration! Hurry up!

The "executive summary", with the new or improved features that matter most for architectural modeling and visualization:

  • Physical Renderer: an additional rendering engine which supports physical properties for rendering, such as more integrated and accurate motion blur, depth-of-field, lens distortion.
  • Stereoscopic Workflow: 3D movies are "hot" (well, still have to see one to be convinced) and this is quite convenient if you are already working in 3D. Still, without the proper hardware, you can not see anything of it.
  • Character Animation enhancements: not directly the focus in architectural visualization, but if the setup of a character rig is improved and you can generate walk-cycles more easily, this might be usable by non-specialists. Using motion-capture or manually key-framing a character is only something that the specialists are able to do convincingly.
  • Improved viewport navigation: orbiting and zooming relative to the point you click on will be very welcomed.
  • New XRefs: this is something that will be important when you want to visualize large architectural scenes (e.g. a site with several separate buildings).
Some remarkable "details":
  • No new modeling enhancements.
  • Backwards Compatible: you can open r13 scenes in r12 (!)
So will everybody start upgrading? It seems a good feature set and if the software is still freely available for students, I guess that we will try to stay with the newest release, if it is available in time.

Thứ Tư, 29 tháng 6, 2011

Sculptris : a free 3D sculpting software

Scultpris is a free, cross-platform (Win+OSX) 3D modeling and texturing software, from Pixologic, famous for their ZBrush sculpturing top software. It allows you to work with e.g. Wacom tablets and can handle both 3D meshes and the texturing, although you can combine this with Photoshop and other 3D software.

After some minutes dabbling with a small Wacom tablet
Info on http://www.pixologic.com/sculptris/ (current version is Alpha 6, indicating it is not fully finished)

Real example from Sculptris website (artist: Barry Croucher)
While the ZBrush software is seen as the logical "next" step, when you outgrow Sculptris, it is already quite complete:
  • dynamic tesselation (refinement of the mesh when sculpting) to support details in the regions which require it, without having to overwhelm the rest of the model with more smooth, flat surfaces.
  • painterly-like interface, dark color scheme, icons, lots of rounded edges. If you use this only occasionally, this might be a disadvantage, though.
  • several brushes and modeling aids (e.g. symmetry mode).
  • custom brushes, based on patterns with alpha channels.
  • masking support, to protect areas of your model.
  • automatic UV creation, which ensures that the model has a well-structured set of texture coordinates, to assist the texturing on a usable texture map. This will also help with imports in other 3D software, e.g. for rendering or animation.
  • support for texture projecting and bump-map painting.

This kind of software (Pixologic Sculptris and ZBrush, Autodesk MudBox) is mostly used in organic character modeling and design, but nothing prevents you from trying to find a use for it in architectural modeling and visualization. BodyPaint (as included with Maxon Cinema4D) is different, as it is a "paint-on-model" software, allowing you to work as if you where in Photoshop but on the texture map and live on the 3D model. ZBrush and the like will actually model and modify the geometry as well (the mesh).

Thứ Sáu, 10 tháng 6, 2011

Announce: Virtual Design World Cup

Check out http://virtualdesignworldcup.org/2011/

This is a sponsored competition for students to combining BIM and Virtual Reality models. The participants can win large prices, but they have to use the software proposed by the organization (being Allplan and UC-win/Road).
Welcome! This student competition utilizes Building Information Models (BIM) and Virtual Reality (VR) technology to aid in the design of an innovative pedestrian bridge. Participate for your chance to win the $12,000 Grand Prize!
Two pieces of software will be used and are provided to contestants for free (for the duration of the competition): BIM software Allplan by Nemetschek and VR software UC-win/Road by Forum8.
The request is not so simple:
The concept for this competition is based on the design of Shibuya bridge – a new way of imagining Tokyo’s most famous intersection. The criteria includes architectural design and visualization of a pedestrian bridge/deck in, around, or above the context of this landmark. Participants must complete the design with a wide range of technologies in architecture and civil engineering, including the mandatory software packages UC-win/Road and Allplan. Judging is performed on the basis of various design aspects including architectural/landscape design, structural design, pedestrian/traffic control, wind analysis, internal landscape evaluation with walk-though, and eco-friendly design. 

Thứ Hai, 6 tháng 6, 2011

Karamba : I'm slowly getting started

In my recent quest to discover possible tools for design analysis, I already noticed Karamba, which is a free (for now?) Grasshopper-plugin for integrated structural calculation.

It means you can define a structural system, with beams and loads and with control over connectivity, support conditions (degrees of freedom of nodes) and analyze it directly within Grasshopper. Real-time if possible. Nice.

So I launched Parallels Desktop and stepped through the manual (which is well-written!) and tried to create a basic learning example. Don't shoot me if there are glaring mistakes in this, as I have to re-learn some of the things that have been kept under a rock for the last 10 years (Finite Element Analysis, Building Mechanics).

The following screenshot displays a small example with three nodes, two beams and a single force. The nice thing is that, once this is setup, you can interactively play with it, e.g. move nodes, adjust the force, with the simulation running alongside.


With some preparation and list-juggling, you can make quite complex structural systems. Just not right now for me, as I have to ensure I do some side-by-side comparisons (running existing examples through different systems).

 --- edit ---

Just playing a bit and adding a second example. Here I used a freeform curve and using the Divide and Shatter components in Grasshopper turned them into a range of different curves, fed into the Karamba calculation. Being able to tweak in real-time the position of the load (onto any of the nodes) has a huge didactic potential for students and designers.

Thứ Hai, 9 tháng 5, 2011

DebunkTheBIM: Dear building owners: we will let you know what you need to know when and how WE think you should get to know it!

DebunkTheBIM: Dear building owners: we will let you know what you need to know when and how WE think you should get to know it!

As a reaction to this post and venting some ideas on my own blog, I'd like to add some comments here.

I agree that most model viewers are very limited and only focus on 3D mesh + textures/color.
E.g. the Virtual Building Explorer (VBE) from Graphisoft (add-on for ArchiCAD) goes some way to make the design "viewable" by a user but don't expect the actual bulding information to be intact. It has gravity and collision detection (you can't walk through walls and you fall down when you pass an edge).

However, if you want, you can do a lot of that but you have to do it yourself... I happen to like Unity3D as a 3D realtime platform (and the free version goes a long way to do almost anything, apart from realtime shadows). But my remarks are not (too) software specific. Just that I will focus on things I know will work.

  • if you need north angles etc.. add some mesh objects to visualize that. This is possible with any software. In e.g. ArchiCAD, the quite flexible GDL library objects can be programmed so they orient themselves to north automatically. In an interactive environment, you could even program a small "HUD" (heads-up-display) which will draw the north angle as an overlay over your view, like the "radar" image in many shooting games does.
  • levels and spaces/zones are indeed mostly part of the 2D workflow. However, in e.g. ArchiCAD you have the option to render the spaces as 3D objects, which will enable them in any 3D model export you perform. The trick is now to ensure you can toggle spaces on and off in the viewer. In a out-of-the-box solution this is a problem, unless layers are user-togglable, but in a programmable environment you have control over this. You can even toggle an info dialog when users enter a space.
  • grids are also 2D, but with some clever 3D object, it might be viewable in 3D as well. But you have to take your audience into account, as this is not always useful information for them.
  • As far as visualizing design intent, I assume that you can get some way by making design variants and make separate visualizations or merge them in a single scene if you can toggle their visibility from within the viewer.
  • Tagging > as a flexible way to attach "any" info to "any" object, you can attach meaning to design objects. Now if viewers would have custom filters to display or hide objects based on their tags, you can get quite advanced additional visualization. I know that ArchiCAD supports markup highlights (color coding) on objects and you can create different views based on that info, but the same as with the previous remark: you have to find a way to provide this visibility to end users.
Understand that all these gripes are correct and to the point. I only wanted to point out some approaches to tackle at least some of them with current software.

I hope I can illustrate some of these points myself later on, with an interactive example...

Thứ Năm, 24 tháng 3, 2011

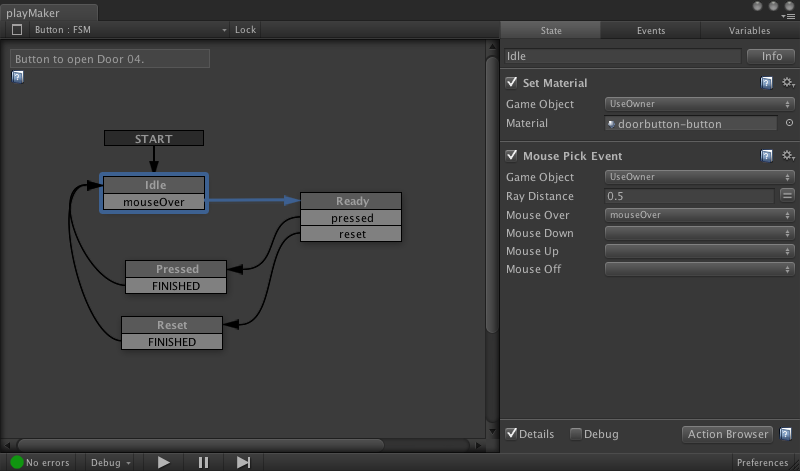
Playmaker : visual scripting for Unity3D

Playmaker is a visual scripting editor that you can install inside Unity3D, the well-known game authoring environment. Within Playmaker, you can create the logic of your interactions visually, without needing to script.

Playmaker screenshot
Remembering the power of scripting and the sometimes cumbersome approach of visual programming, I just wonder in how far they manage to let you mix both: that is, use custom scripts (or re-use existing ones) and then combine this or even integrate this with Playmaker. Cause if this is hard to do, you are obliged to do everything inside this tool.

But it is an interesting approach.

Playmaker is not free (about $100) and works in all versions of Unity (free, commercial, iPhone) with Android in preparation. It can be bought from the Unity Assets store.

Thứ Hai, 14 tháng 3, 2011

NeoAxis Game Engine

NeoAxis is a recent Game Engine, built on top of the OGRE Open Source Game engine.

While OGRE can be used as such, the NeoAxis group is wrapping it inside a more complete authoring system, not unlike Unity3D, which is a real advantage for artists, who are not always interested in the hard-core coding that goes on in the background. I believe that this pertains for most architects as well, hence the success of Unity3D and SketchUp.


NeoAxis runs on Windows and can create both standalone games and web applets. You can use the free non-commercial version or buy a cheap $100 Indie license.


There are people working on a plugin for SketchUp to get models into NeoAxis more easily: http://forums.sketchucation.com/viewtopic.php?f=323&t=32412

From SketchUp free to Unity3D

While there are many ways to go from SketchUp to Unity3D Game engine, having the free version poses serious limits.

  • In the Pro version, FBX and Collada export are intergrated and work fine. However, the free version has problems. While there is Collada export in the Free version, Unity3D fails to properly import the geometry.
  • One approach is to use conversion software. The Open Source Blender is known to be able to import DAE files from SketchUp and export them into an FBX file that Unity3D understands.
  • Another approach is with the LightUp plugin for SketchUp. This is not free, but is a good approach to do shadow and light baking and has an integrated FBX exporter that works fine in Unity3D.

But you can also extend SketchUp with ruby scripts.

On http://forums.sketchucation.com/viewtopic.php?f=323&t=33448 you can download an OBJ exporter script (the old Alias Wavefront format) which Unity3D understands. It is best to export into a separate folder, as depending on how you textured your model, multiple materials could be generated.

Thứ Tư, 26 tháng 1, 2011

Getting from SketchUp to Unity with shadows and lighting

The following short (and silent - for now) videos present a full overview of getting a model from SketchUp into Unity3D. It uses the demo-version of the LightUp plug-in for SketchUp, which is fully functional (for a while). This works with the free and the Pro versions of Unity and SketchUp, on Windows and OSX.

The model in SketchUp and lighting it with LightUp


LightUp 4 SketchUp (1) Inside SketchUp from Stefan Boeykens on Vimeo.
This video describes how to lighten a SketchUp model with the LightUp plugin. I'm using the demo version of LightUp (v1.1) inside SketchUp 8 Pro for OSX.

Transferring the SketchUp model into Unity using FBX format


LightUp 4 SketchUp (2) Export FBX for Unity from Stefan Boeykens on Vimeo.
To get a SketchUp model, baked with Lightup, into Unity3D, you can use the integrated FBX exporter. This also works in the free version of SketchUp, which does not support FBX.

The integrated FBX exporter includes the baked lightmap and the secondary UV coordinates that are required in Unity, to have the two textures correctly mapped.

You should also install the Lightup support scripts in an "Editor" folder that you can create in your assets folder of your Unity project, as this will automatically assign the Lightmap shaders and load the lightmap textures.

Updating the SketchUp model and reloading it in Unity


LightUp 4 SketchUp (3) Modify and Update from Stefan Boeykens on Vimeo.
Even after we placed the SketchUp model inside Unity, we can continue working on it. After the scene was prepared in Unity with a default 3d person controller, we modified the geometry inside SketchUp, recalled LightUp and exported the model over the existing one, inside the Unity project Assets folder, to replace it.
Unity then reloads the whole scene, leaving all interaction in place.

Thứ Ba, 25 tháng 1, 2011

Panda3D : free Open Source game engine

The Open Source Panda3D game engine can be used to create C++ and Python games. The latest version has support to generate a webplayer and some advanced shader techniques (shadows, Screen Space Ambient Occlusion and geometry shaders).

Disney uses this engine for the Pirates of the Caribbean web games, so I guess that it has more then enough features if you push it hard enough.

Some interesting Unity3D packages from Forest Johnson

At http://forestjohnson.blogspot.com/search/label/unity%20packages you can find some (older) Unity Packages by Forest Johnson for Unity3D, the cross-platform game engine.

I did manage to get the following examples to run on my free version on OSX:

  • the lightmapper. With some effort and slight adjustments to the scripts, the demo ran. It creates a shadow map as a texture which is calculated when the game starts. While the new Unity3D 3.x has the Autodesk BEAST lightmapper included, this approach might come in handy as it shows an approach to avoid the lack of "Render to texture" from the Pro version.

  • The real time raytracer did actually work quite well, although the image is rather crude. Imagine real-time raytraced reflections in your model. Might require some hacking to have it work more easily in custom projects, but the source is remarkably short as the lion's share of work is using the built-in raycast feature from Unity itself.
  • Real-time SSAO or "screen space ambient occlusion" > this technique is currently available as part of Unity Pro only, so I was hoping to have this script work in the free version, but alas, I could not run it due to some error I could not immediately solve.

Thứ Năm, 16 tháng 12, 2010

Render[in] : Radiosity rendering for SketchUp

Render[in] is currently in beta-testing till the end of December 2010 and during that time, you can freely request a serial number to test it. It works on Windows and OSX.

Specifics:

  • fully integrated (using native SketchUp features)
  • radiosity in real-time (!)
  • additional control
    • advanced material settings
    • sky & clouds & environment
    • artificial light

Info on http://www.renderin.com

Thứ Ba, 16 tháng 11, 2010

Graphisoft Virtual Building Explorer available for students

The Virtual Building Explorer (originally born as the Zermatt plugin) is an add-on to ArchiCAD to export the 3D Building Model into a realtime model to send to others, without requiring ArchiCAD.

You can export the 3D Geometry into a standalone PC or Mac application and include a radiosity-like graphics style, which is not available in ArchiCAD itself.

This software was recently updated to version 2 and from now on, educational users (students, teachers, schools) can use the software under the same conditions as the free educational version of ArchiCAD.


Thứ Hai, 25 tháng 10, 2010

Some freebies for video from Zach Poff

If you work with video, from webcams, video cameras or rendered, there are several complex manipulations that can be made a bit easier with some of the free utilities for realtime video editing. The website of artist and developer Zach Poff has some free applications for download. They are Open Source, but are made in MAX/MSP, which is the commercial counterpart of Puredata. And the applications are only compiled for Mac OSX.

Some of the things he presents:
  • Live Video Delay: view your video frames with a delay
  • Chroma Key Live: see a rough estimate of the effect of filming against green (or blue or purple) screen, live
  • Multiscreener: synchronize the playback of movies on different computers
  • Video Trigger: trigger sounds when something happens on certain parts of a video capture
  • ...

Some of these functionality could be done in other systems, obviously, but having it in a precompiled utility will make it easier if one of his programs already does what you need. E.g. video installation reacting in realtime to visitors.

Thứ Hai, 11 tháng 10, 2010

Octane Render (GPU based rendering)

The Belgian/New Zealand team at Refractive Software created the "Octane Render" system. This is a GPU (graphics card) based rendering system, using physically based algorithms for realistic and fast lighting calculation. It relies on CUDA support, which requires a fairly recent nVidia card to be installed in your computer. It is not-free, but cross-platform and the current beta-license is reasonably cheap (€99).

There are already plugins for Maya, 3ds Max and Blender and support for SketchUp and Cinema4D is in preparation. You can load Wavefront *.obj models or RenderMan *.rib scenes.

I've tried using it on my Macbook Pro. You need to first install the nVidia CUDA drivers and CUDA toolkit and then the Octane software. I actually did it in reverse order, but managed to get it running. Then you can load one of the example scenes or try to load one of your own models (e.g. export an OBJ file from your modeling software).

As it did seem to work, the speed was not that good and this is due to the hardware in the Macbook Pro. It has two GPUs: a modest integrate Geforce 9400M one and a better 9600M GT (more memory, faster CPU, more cores). You can even enable Octane to use both, but the truth is that they are only modest (if not slow) compared to current GPU cards. This is one of those cases where a Desktop PC would allow you to buy a €100 card and insert it. Not with laptops. The Device manager allows you to see the specs of the GPU and even add all of the available cards in your system to the GPU pool (alas, the whole system froze when I activated both GPU cards).

So it worked more or less for me, but not with the advantages that you would use such an application for.

Thứ Năm, 30 tháng 9, 2010

Unity3 is released - some thoughts on architectural realtime visualization

The new release of Unity3D is available now. Unity3D is a full game-creation system which you can combine with (almost) any modeling software. You use it as your main game management system, where you import models and textures (assets), create scripts for all interaction and directly assemble game scenes or levels.

It is cross-platform (Windows and OSX) and allows you to make games for Windows, OSX (even if you have the "other" platform only), for a web-browser and with separate licenses for the creation of games for Android, Wii, XBox and iOS (iPhone, iPod Touch or iPad), if I'm not mistaken.

Some thoughts about Unity3D in general

Nice highlights for me:
  • realtime physics
  • prefabs for basic camera navigation
  • easy environment skies
  • directly interact with your game in the Unity editor
  • reasonably straightforward scripting (although I have learned a few things from the Game Development Essentials book as well).
We have used it last year in our CAAD classes to learn (something) about realtime architecture and had reasonably good results importing models from SketchUp and Cinema4D. ArchiCAD models were also attempted, but they passed through Cinema4D as well for best results.

Some thoughts and tips about lights and shadows

There is a free version and a pro-version with more features. For architecture students, the free version is nice, although the pro-version has some better material shaders and support for realtime shadows and occlusion culling. Lightbaking (rendering shadows onto the materials) is quite some process if you're new at it and it took me quite some time to get reasonable results due to some minor Cinema4D limitations, but I documented my process as a screen movie in Vimeo. This was done in Unity 2.x.
Step 1

SKUP2UNITY 5 : Cinema4D Light Baking (1) from Stefan Boeykens on Vimeo.
While the non-free Unity3D Pro has some options for realtime shadows and lighting, it is often quite computationally expensive (takes a lot of CPU cycles for calculations).

The last step(s) are more involved and you can not do this with SketchUp alone... You could use 3ds Max or the LightUp SketchUp plugin or other tools. But as a student you can get a free license for Cinema4D, which can help you with baking the lighting into a texture map. This will render the scene, but instead of showing it on the screen it will be rendered onto a texture map which is wrapped around (a copy of) the model.

Step 1: getting the SketchUp model into Cinema4D (using the FBX file). Set units to Meters in C4D and ensure that all texture maps are properly found. You could rename the textures folder into "tex".

Step 2


SKUP2UNITY 6 : Cinema4D Light Baking (2) from Stefan Boeykens on Vimeo.
Step 2: preparing a Sky, Ambient Occlusion and Global Illumination in Cinema4D. Then start baking the single mesh into an object (include AO and Illuminate and Single Texture). Photoshop file format is fine.

Step 3


SKUP2UNITY 7 : Cinema4D Light Baking (3) from Stefan Boeykens on Vimeo.
Step 3: the baked model is renamed (for clarity in the Unity3D editor) and the model saved. In the background, Unity3D will let Cinema4D generate a proper FBX file for import and load all. Hide the non-baked mesh and only display the baked one. Switch to a Lightmapped Diffuse material and point to the right texture maps for the material.

Beware, there are some minor issues:
* be sure to hide the original mesh in Unity3D
* if you include illumination into the baking process in Cinema4D, be sure to copy the texture map also in the Diffuse channel, to have proper UV-coordinates for the mesh in Unity. Otherwise, you end up with a black mesh.
* Inside Unity3D, hide what you don't need and make sure the correct baked textures are used by the materials.
Release 3 has some support for lightbaking built-in, but as the realtime shadows are not supported in the free version, you would still need a Pro license for full shadow baking (or bake in external rendering software).